Design Systems · MAR 18, 2026
I built a full fitness coaching website with AI in one conversation
Landing page, pricing, testimonials, contact form, blog section, and 3 full articles — all from 5 prompts in Claude Code. Here's exactly how to do it and publish it for free.
The final result
4 pages, 5 prompts, one Claude Code session. All static HTML.
What I built (and what you'll get)
A complete, premium fitness coaching website with a single Claude Code session. No templates, no Wordpress, no Figma. Just natural language prompts and iterating until it looked right.
The final site includes:
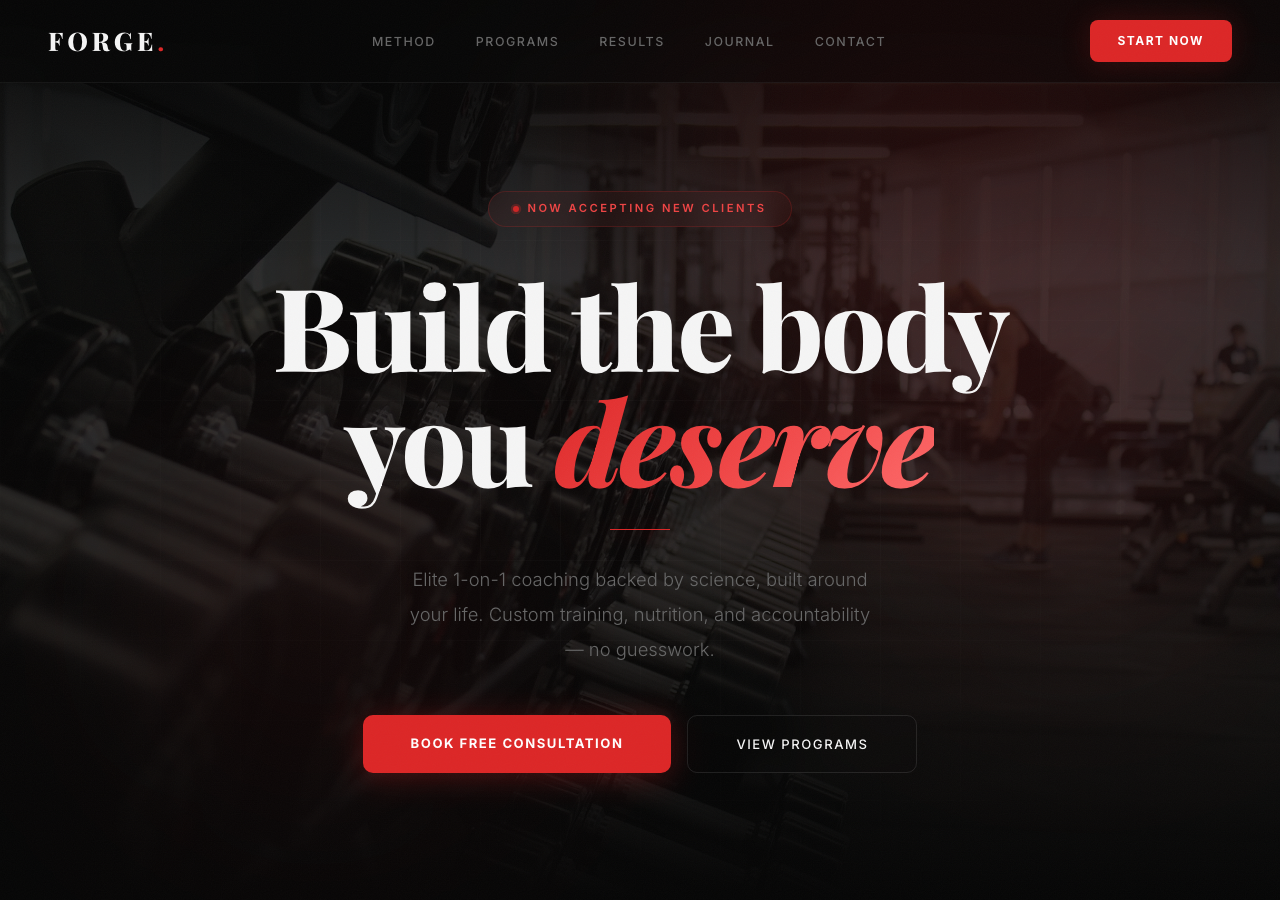
- Landing page — animated hero, scroll reveals, glassmorphism cards, grain texture, glow effects
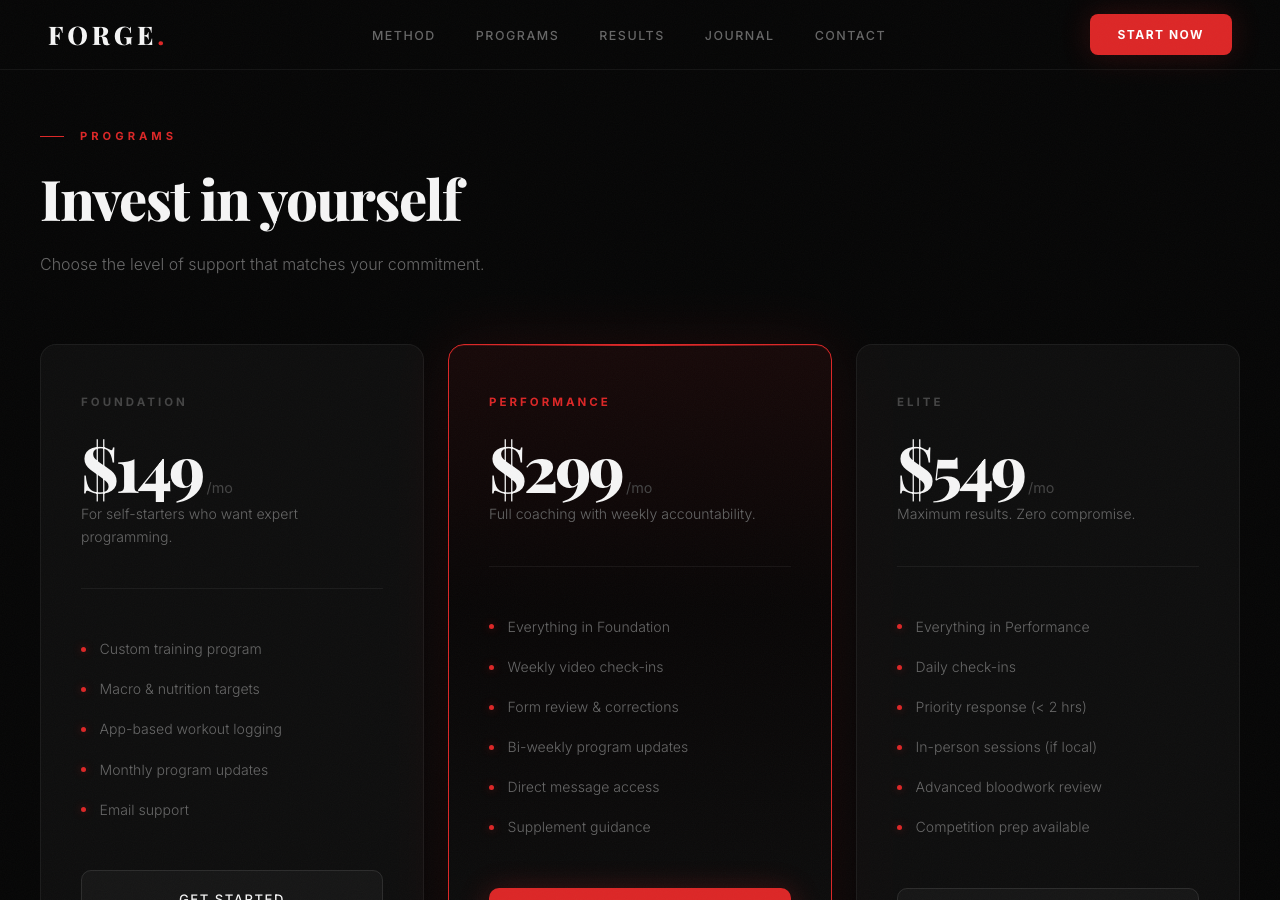
- Pricing section — 3-tier layout with featured plan and hover animations
- Testimonials — client reviews with star ratings
- Contact form — styled form with validation-ready inputs
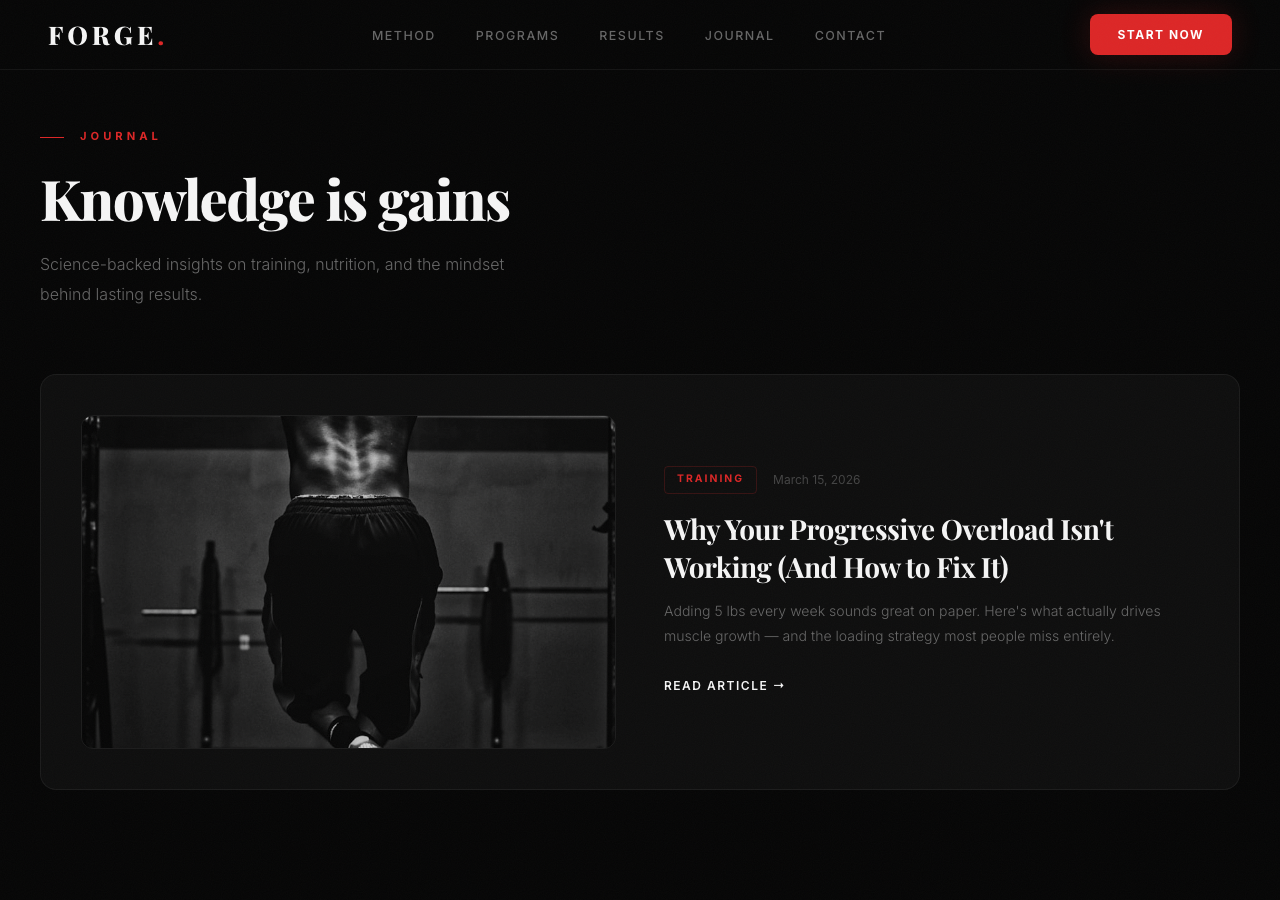
- Blog section — featured post + card grid linking to full articles
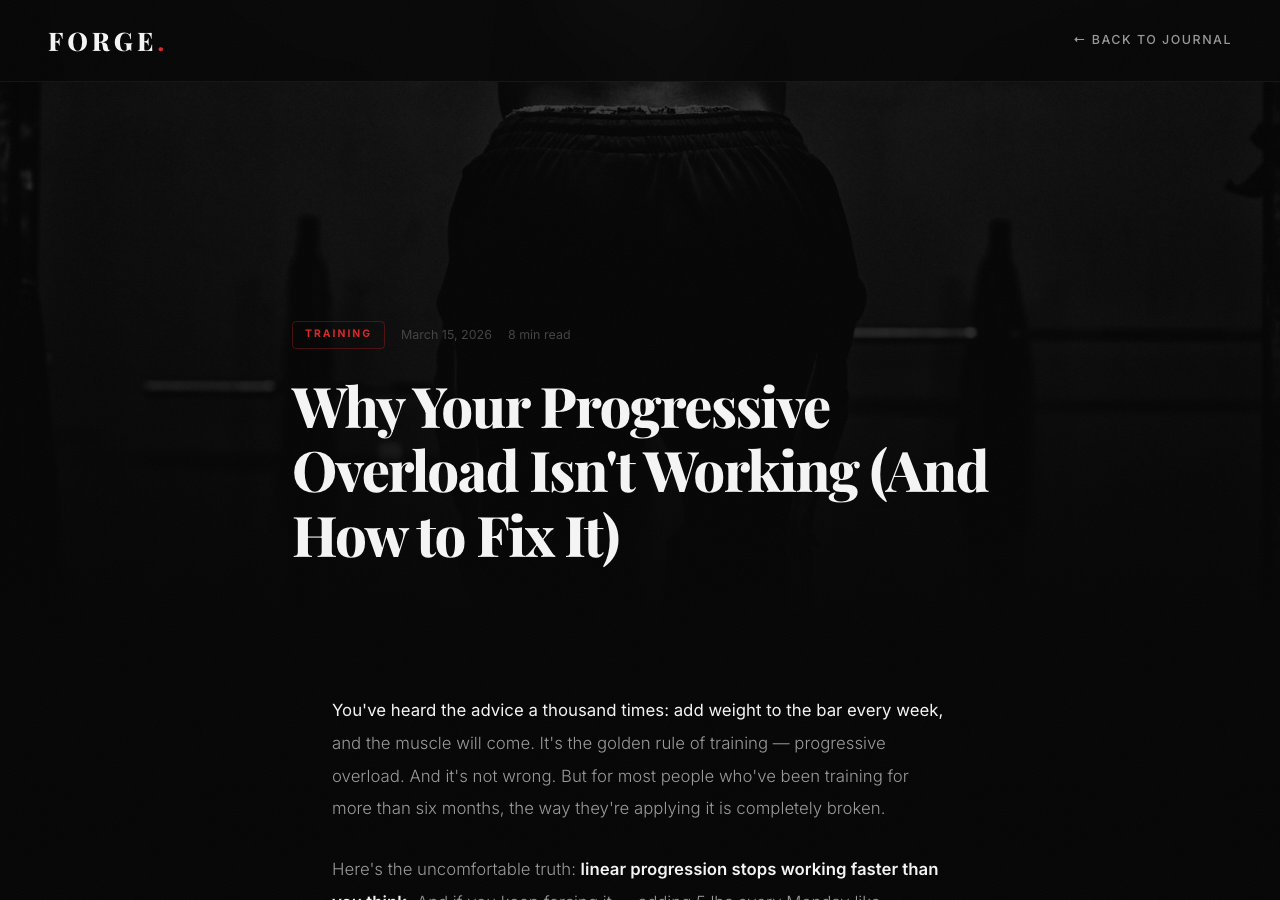
- 3 full-length articles — 1,400-1,600 words each, with reading progress bars, inline images, callout boxes, author bios, and cross-links
Total files: 4 HTML pages. Total time: one conversation. Everything is static HTML/CSS/JS — no frameworks, no build tools, no dependencies.
Tools used
- Claude Code (Claude Max subscription) — the AI that wrote every line of HTML, CSS, and JS
- Unsplash — free image CDN for high-quality stock photos (hotlinked, no downloads needed)
- Vercel — free hosting and deployment (one command to go live)
- A browser — to preview and give feedback
Step 1: Prompt Claude Code for the landing page
Describe the business and sections you need
Start broad. Tell Claude what kind of business this is and what sections the page needs. Don't overthink it — you'll iterate.
build me a landing page for a fitness coaching business.
Hero section, pricing, testimonials, contact form.
Make it look premium.
Claude will generate a complete HTML file with all sections, styled and functional. Open it in your browser to see what you're working with. It won't be perfect yet — that's the point.
Step 2: Iterate on design
This is where the magic happens. You look at the page, decide what's off, and tell Claude to fix it. Each round gets you closer.
Set the color theme
The first version came out with a generic light theme. One prompt to fix that:
change the color theme to dark and red instead,
and add a section for blog posts
Now you have a dark background with red accents, plus a new blog section. Two changes, one prompt.
Push the visual quality
The page looked fine, but not impressive. No images, no motion, nothing that says "premium." This is where direct, opinionated feedback works best:
can you make it 10x more premium? like theres no images
or anything on it, it needs to look way better and wow people
Claude responded with: animated gradient backgrounds, scroll-reveal animations, glassmorphism cards, film grain texture overlays, glowing red accents, animated stat counters, and parallax-style hero effects. It also added Unsplash images directly via CDN URL — no downloading or hosting needed.
Step 3: Generate full blog articles
Ask Claude to write the articles and create the pages
The landing page had a blog section with three article cards, but they linked to nowhere. One prompt to fix that:
write the articles and make the pages on the blog postClaude created three complete HTML pages, each with 1,400-1,600 words of real fitness content:
- Progressive Overload — why linear progression fails, the 5 levers of overload, a 12-week periodization framework
- Protein Timing — debunking the anabolic window myth, daily intake calculations with a data table, simplified protocol
- Staying Consistent — identity-based habits, 7 systems that replace motivation, the 2-day rule
Each article includes: hero image with gradient overlay, red reading progress bar, inline images, styled blockquotes, callout boxes, author bio card, CTA to book a consultation, and cross-links to the other articles. Claude also updated the landing page links to point to the new pages.
Step 4: Publish to the internet with Vercel
You have 4 HTML files sitting on your computer. Here's how to make them live on the internet in under 2 minutes.
Install Vercel CLI (one time)
npm install -g vercelIf you don't have Node.js installed, grab it from nodejs.org first. The Vercel CLI is how you deploy from your terminal.
Deploy from your project folder
cd your-project-folder
vercel
Vercel will ask a few questions the first time (link to account, project name). Say yes to everything. It detects your static HTML files automatically — no config needed.
Within 30 seconds, you'll get a live URL like your-project.vercel.app. That's it. Your site is live.
Push to production
vercel --prodThe first deploy creates a preview URL. Running vercel --prod promotes it to your production domain. Every future change follows the same flow: edit files, run vercel --prod.
The exact prompts I used
The entire site was built with 5 prompts. Here they are in order:
build me a landing page for a fitness coaching business. Hero section, pricing, testimonials, contact form. Make it look premium.
change the color theme to dark and red instead, and add a section for blog posts
can you make it 10x more premium? like theres no images or anything on it, it needs to look way better and wow people
can you download images that are relevant and add them?
write the articles and make the pages on the blog post
That's it. Five prompts got me a 4-page website with animations, images, and 4,500+ words of blog content. The key pattern: start broad, then give specific visual feedback.
Next steps: domain, forms, SEO
The site is live, but there are a few things to do to make it a real business tool:
1. Add a custom domain
Buy a domain from Namecheap, Google Domains, or Cloudflare Registrar (usually $10-15/year). In Vercel, go to your project settings → Domains → add your domain. Vercel handles SSL and DNS automatically.
2. Make the contact form work
The form currently doesn't submit anywhere. Easiest options:
- Formspree.io — add their endpoint to the form's action attribute. Free for 50 submissions/month. Takes 2 minutes.
- Netlify Forms — if you switch hosting to Netlify, forms work with zero config.
- Google Forms embed — replace the form with an embedded Google Form for the quickest setup.
3. Add SEO basics
Ask Claude Code to add meta tags, Open Graph tags, and a sitemap. One prompt:
add SEO meta tags, Open Graph tags for social sharing,
and generate a sitemap.xml for all 4 pages
4. Add analytics
Drop in Vercel Analytics (free, one click in dashboard) or Plausible (privacy-friendly, one script tag). Ask Claude to add the tracking snippet.
5. Keep iterating
The beauty of this workflow is that changes are one prompt away. Want to add a video testimonials section? An FAQ? A scheduling widget? Just ask Claude Code. The site is plain HTML — there's nothing to break.

Written by
@atareh
AI architect & creator. Writing, designing, and producing in AI and tech. Previously head of product at a healthtech SaaS; background in molecular science. Founded gogray.today in 2017.
Related
Keep reading.
Made by @atareh · x / twitter · instagram